
Tracking website visitors' behavior is crucial for gaining insights into their engagement and optimizing digital strategies. One significant aspect of user interaction is downloading files, such as documents, software, or media files. Understanding how users engage with these downloads can provide valuable data for improving content offerings and measuring conversion rates.
As you probably know, Google Analytics released a new, updated version, and in this blog post, we will explore the best practices and insights for tracking downloads using Google Analytics 4 (GA4).
Understanding Downloads in GA4
In Google Analytics 4 (GA4), a download event is triggered when a user clicks a download link or button, signaling their intent to retrieve a particular file. GA4 tracks these download events by capturing relevant data, such as the file's URL, the user's session information, and other event parameters. Website owners can then analyze and measure the engagement levels of their downloadable content, gaining valuable insights into user preferences, content popularity, and conversion rates.
Before we dive into setting up download tracking, we first need to explain two fundamental terms: gated and ungated content. Both are types of downloadable content, but the difference is whether users need to provide personal information first..
Gated and ungated content
Gated content requires users to share their personal information (usually their email) to download the materials. This option is great if your downloadable materials are intended to be lead magnets. For example, every piece of content that benefits people interested in your service or product is a lead magnet.
You can probably guess where this is going - when users leave some information, it’s much easier to track them. Each download will be counted, you’ll be able to see it, and most importantly, you’ll know to whom it belongs. Additionally, you can use those emails for remarketing purposes and put your product or service in front of the eyes of your potential clients.
Unlike gated content, ungated content doesn’t require leaving any information. Users can download the materials by clicking on the download button. For instance, you can download coupons from a discount website by clicking on the corresponding icon. Unlike gated content, ungated content won’t allow you to trace your leads. If you know that a piece of content is an important step in the customer journey, then you can make it easily accessible. Sometimes users get put off having to share their personal information, so using this option has its own benefit.
Moreover, your internal team or a digital marketing agency can utilize gated and ungated content to achieve different objectives and cater to different customer journey stages. Now that you know the basics about downloadable materials let’s see how you can set download tracking in GA4.
When to use gated versus ungated content
Gating content is a common strategy for businesses aiming to build an email list or generate leads. When content is gated, users must provide their contact information, typically an email address, to gain access. The primary benefits of this method include lead generation, segmentation opportunities, and a sense of exclusivity for users. However, this strategy also carries drawbacks like reduced SEO benefits and limitations in audience building. Gated content could include reports with original research, eBooks, whitepapers, live demos, webinars, and newsletter content.
On the other hand, ungated content is freely accessible on the internet and doesn't require users to provide any contact information. While this approach doesn't directly generate leads, it can help build organic awareness, encourage audience engagement, and offer significant SEO benefits. There are also strategic ways to retarget page visitors and capture potential leads later in the funnel when they are more prepared for direct outreach. Examples of ungated content could be blog posts, videos, podcasts, infographics, and ungated PDFs. In deciding whether to gate or ungate content, businesses should consider their resources, marketing and business goals, industry expectations, and plans for managing collected information.
For our purposes today, we’ll go through why you want to track downloads in GA4; and then we’ll dive into the technical setup of tracking gated content.
Insights from Download Tracking in GA4
In a moment, we’ll go through how to get accurate download data, but first, you may be wondering what insights you can get from download tracking. The answer is simple - many.
Understanding user engagement
Understanding user engagement through tracking downloads in GA4 provides valuable insights into how users interact with downloadable content on your website. By analyzing metrics such as download frequency, duration, conversion rates, or sales forecasts, you can identify which files resonate most with your audience, optimize content offerings, and tailor your marketing strategies accordingly.
Identifying popular and underperforming downloads
When tracking downloads in GA4, you can easily identify popular and underperforming downloads by analyzing the metrics and data provided. By examining the number of downloads, engagement metrics such as time spent on the download page, and conversion rates associated with each file, you can gain insights into which downloads resonate well with users and drive desired actions.
Tracking downloads as part of a user journey analysis
Measuring the effectiveness of downloadable content is also very important. This will help you understand certain downloads' impact on further actions in the customer journey, such as starting a free trial, enrolling for a demo session, registering, or buying a product.
Setting Up Download Tracking in GA4
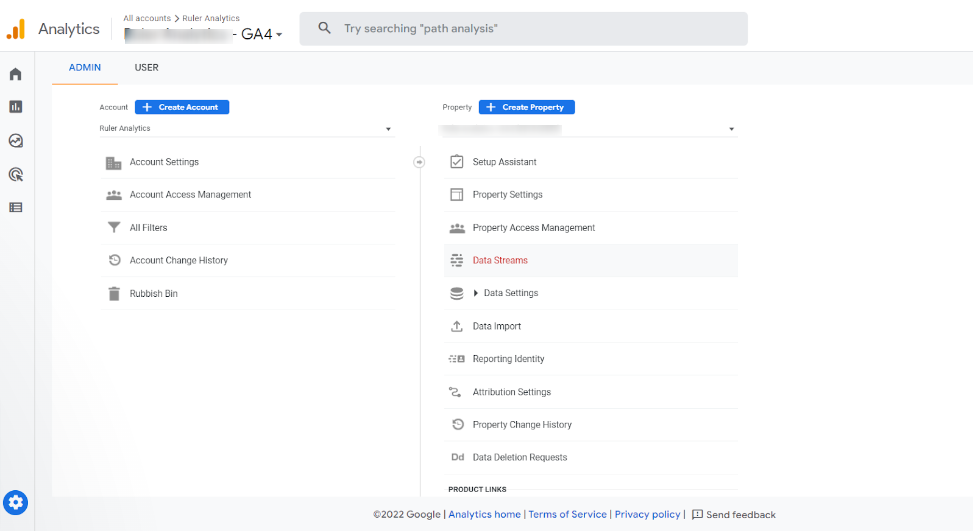
Download tracking happens autoamatically in GA4 if your Data Stream is configured properly. To set it up, go to the Admin section, and under Property, select Data Streams.
Once you click on Data Streams, your next step is to allow Enhanced Measurement.
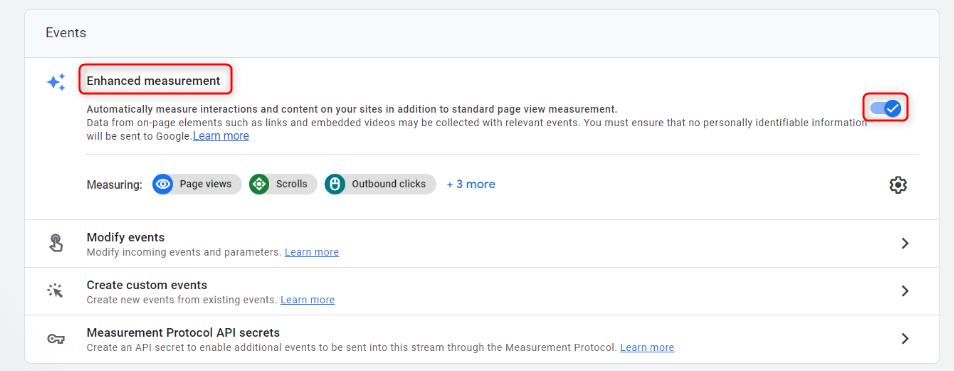
After you enable the enhanced measurement, you need to visit the Settings section by clicking on the gear icon within the enhanced measurement field.
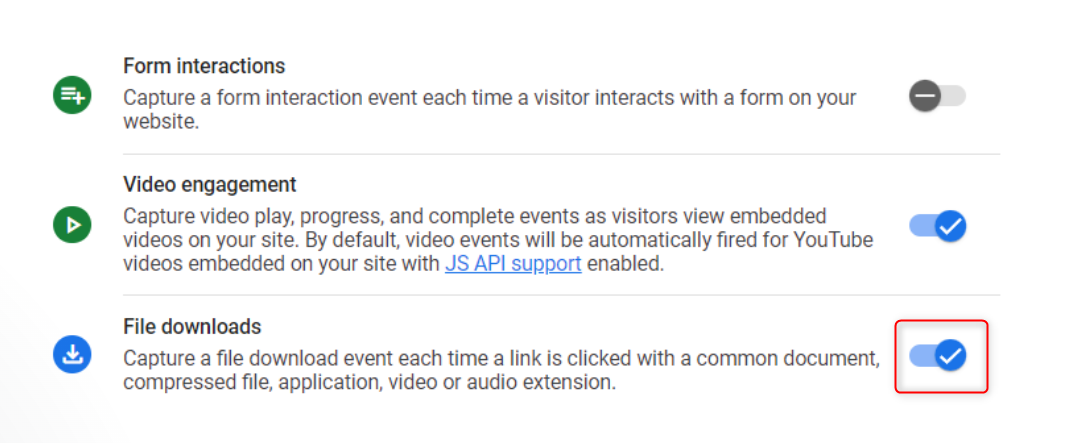
That will open another window where you need to enable File downloads. As you can see, File downloads are one of the options for the Enhanced measurement. Since you’ll probably be doing this for the first time, you’ll have to wait 24 hours before the results populate in the Analytics.
And that’s it; you’re all set! It’s not difficult at all!
The next logical step is to learn how to analyze the download data and create reports that will enable you to get to the next level when tracking downloads.
Analyzing Download Data in GA4
Standard reports
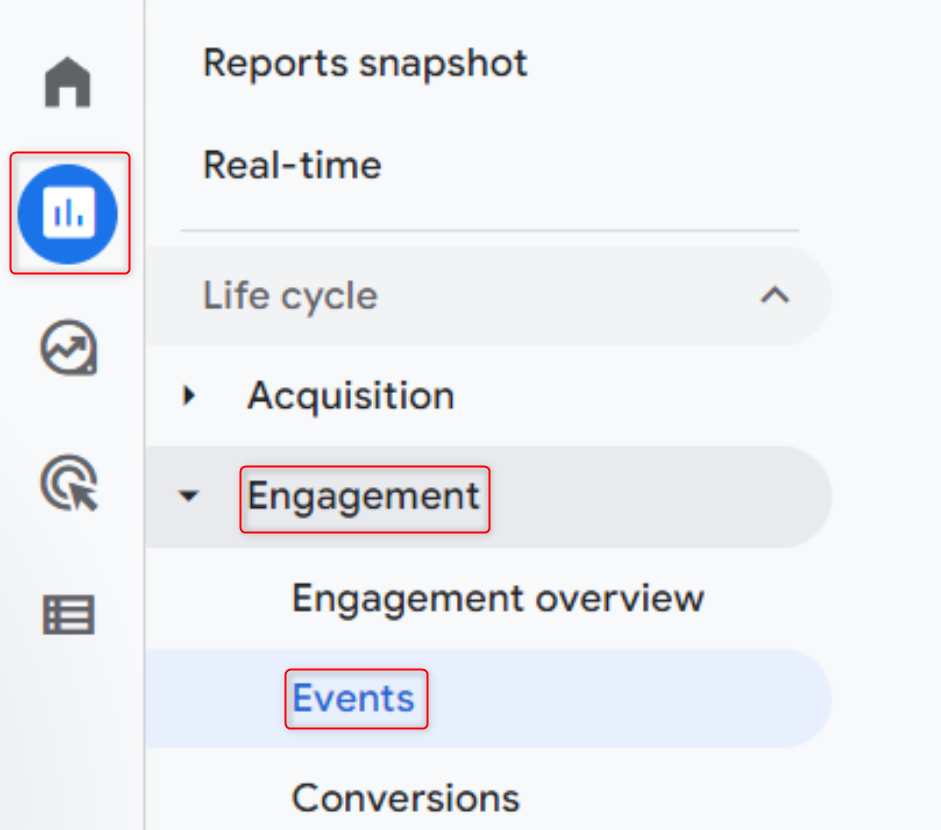
Once you set the download tracker, the results will automatically populate in the Standard reports once you set them up as events. They are called file_download events.
How can you find file_download? Easily, just click on the Reports - Engagement - Events.
Standard reports have some flaws. If you’re tracking only one downloadable material, there will be no problems. But if you have more than that, Standard reports won’t be able to provide you with information.
First of all, all downloads will be grouped, so you won’t be able to see which file got the most downloads. Secondly, you won’t be able to see where the users are downloading those files either.
That’s why it is important to explain the power of Custom reports, which we’ll get to in a moment.
Adding a Secondary Dimension
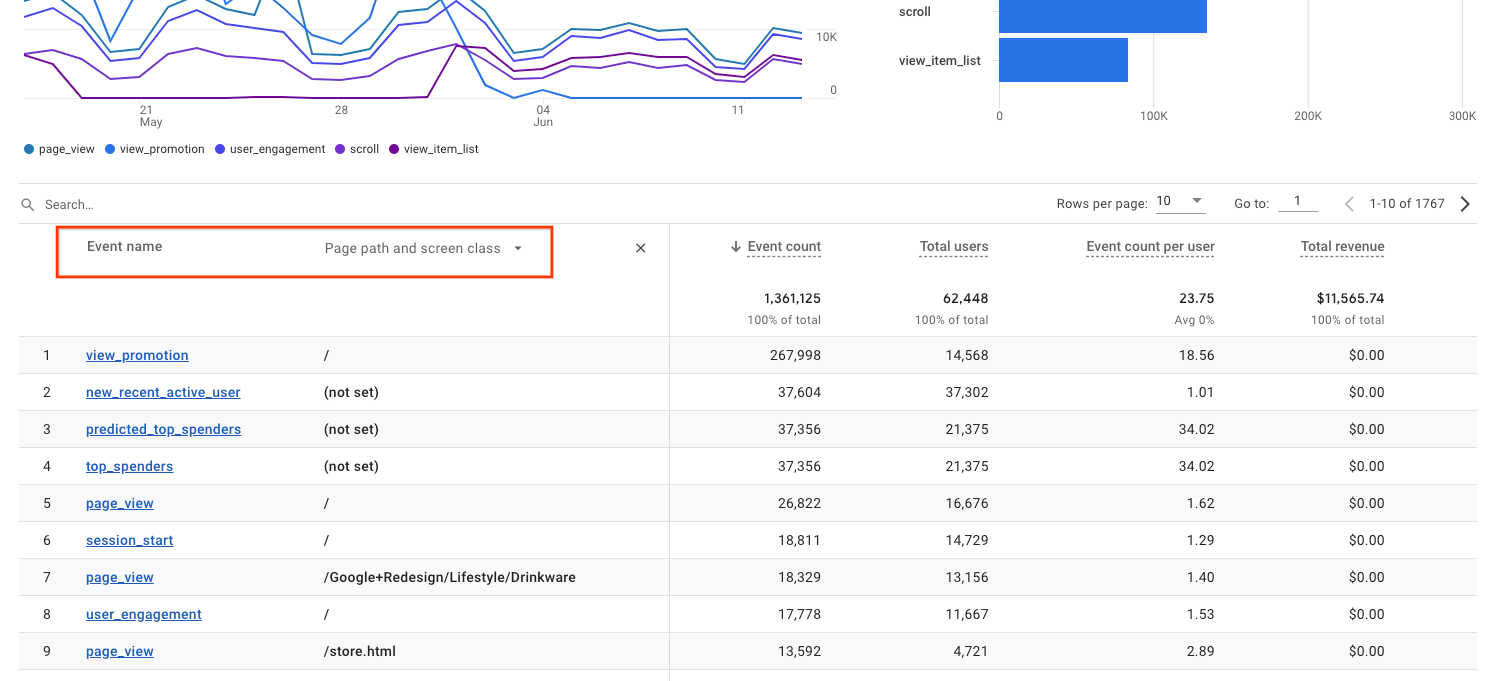
The details report table inherently comes with a primary dimension and up to a dozen metrics. The primary dimension is labeled as such. For instance, in the given detailed report when, "Event name" is the primary dimension, metrics such as "Event count" and "Total users" are included. This arrangement allows for the analysis of each metric relative to one dimension:

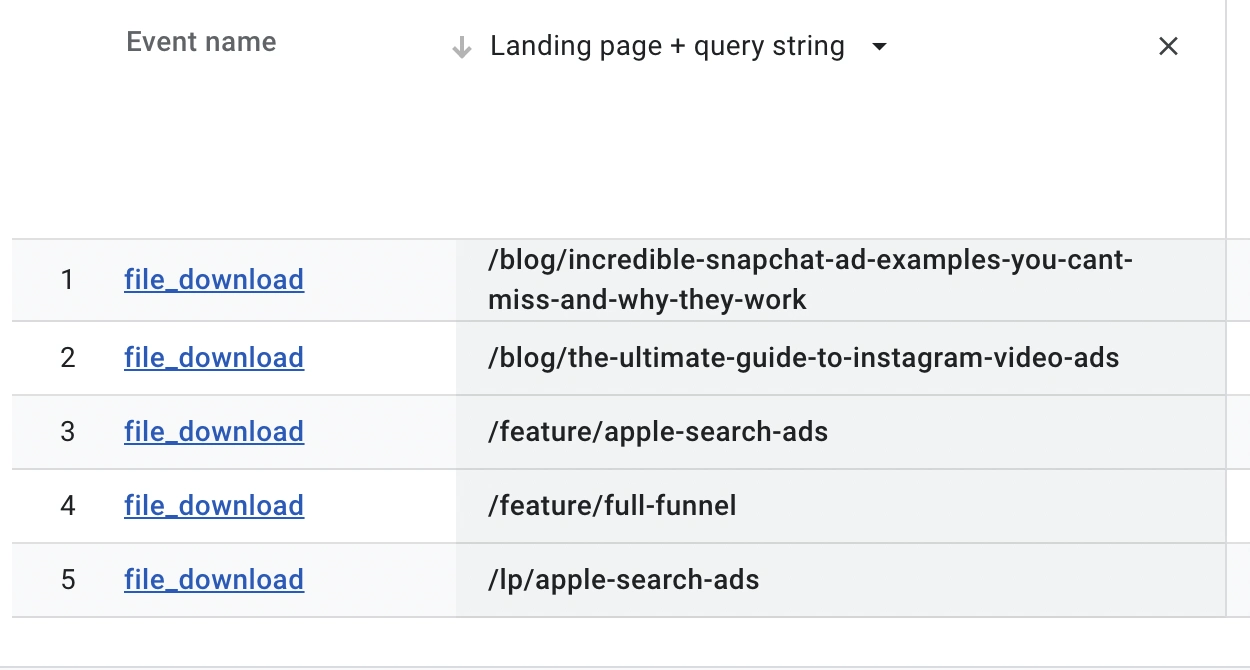
The report can be appended by adding a secondary dimension, facilitating data analysis across two distinct categories. For instance, the table below showcases the page or screen where each event was initiated:
This secondary dimension is a temporary addition and gets removed once you navigate away from the report.
How to Append a Secondary Dimension Adjacent to the primary dimension, click on Add dimension [Plus].
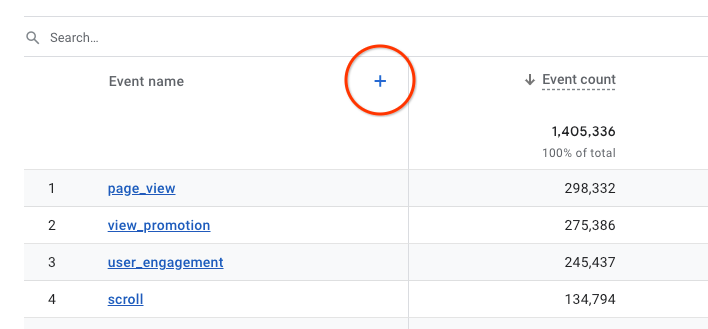
Scan through the list of dimensions, or input the whole or part of the dimension name in the search box. Select the desired dimension name.
Custom reports
Custom reports will enable you to view each download individually by creating their respective views.
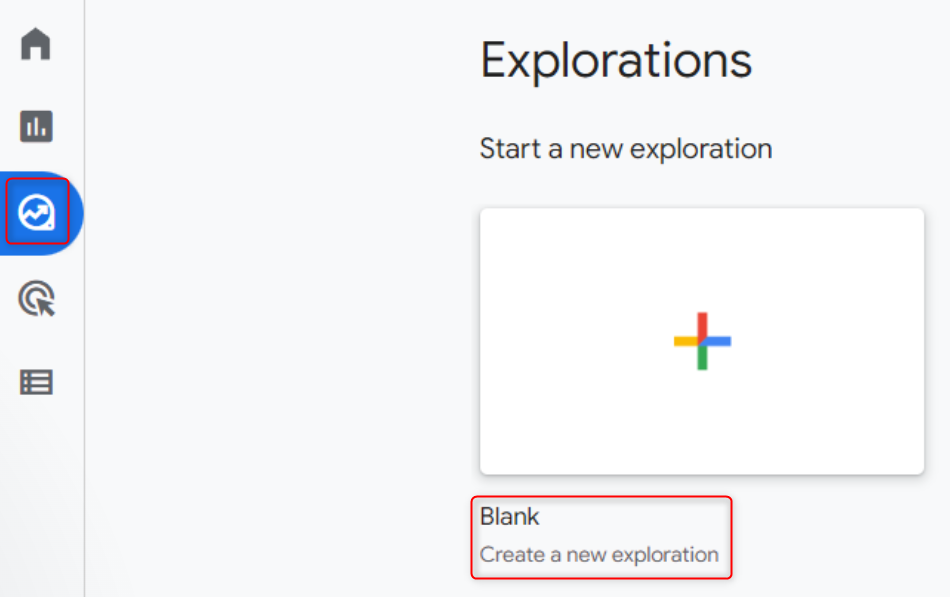
To enable this, go to the Explore section and select Blank - Create new exploration.
Your next step is to name your new report and add the dimensions that you find relevant. Click the + symbol, add the Event name and File name, and finalize this part by clicking Import.

Another thing that you need to select is the metrics. You’ll do that by again clicking on the + symbol and adding Event count and Total users, and again, finalize it by clicking on Import.
Once all of this is set, you need to add all these elements into your report by doing a simple drag-and-drop or a double click on them.
After this, there’s only one little thing to be done. You’ll need to apply a filter to exclude all the other events and limit this report to tracking downloads.
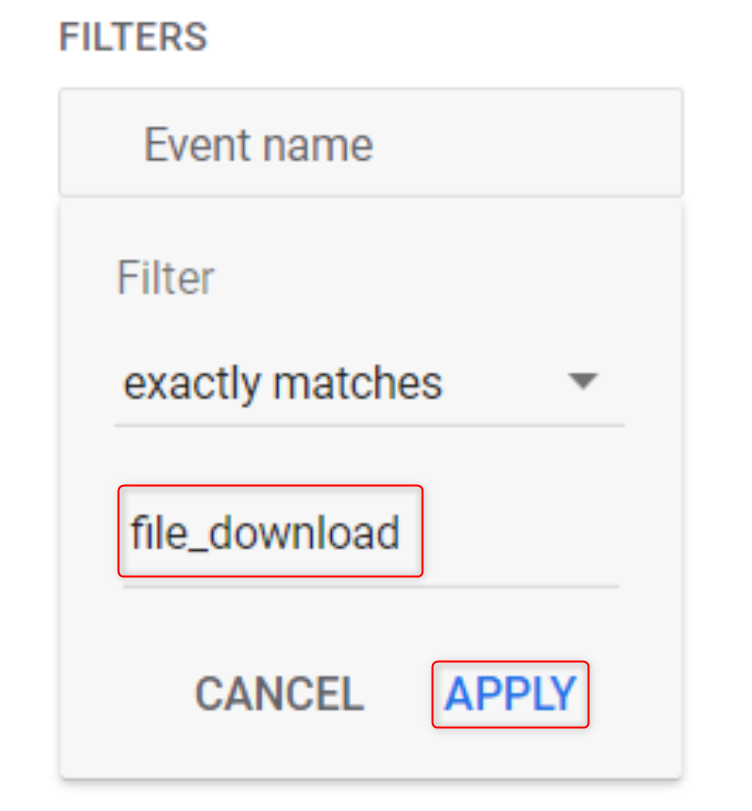
There you have it - only these steps are necessary to keep track of your downloadable materials.
Advanced Techniques for Download Tracking in GA4
Let's cover a couple of more advanced situations for those of you who are always interested in learning more.
Link attribution for tracking downloads from external sources
Once you have enabled Enhanced Measurements, GA4 will “fire” an event called click whenever someone clicks on the link on your website that leads them to another website. Such external links are called outbound links.
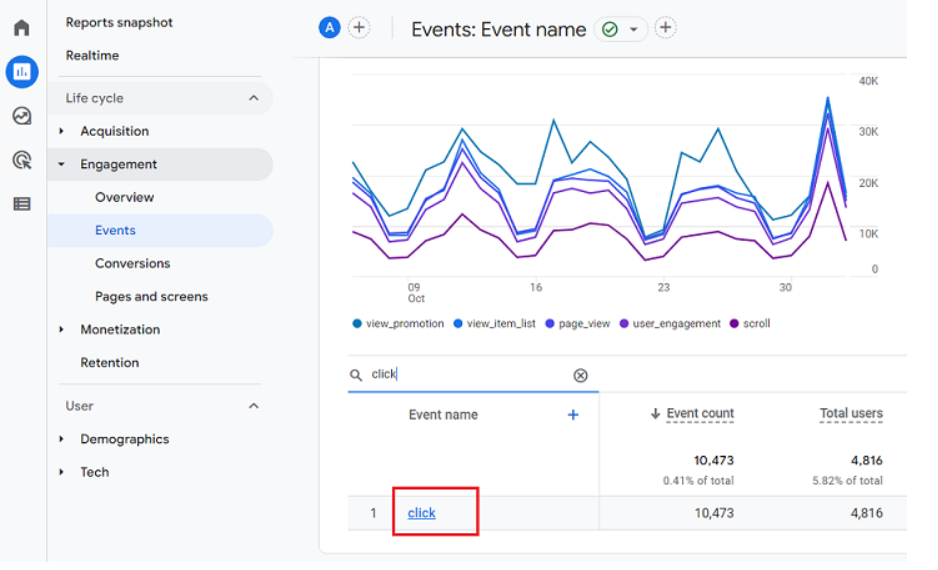
You’ll see all the link URLs and their respective clicks if you click on Click.
How to set outbound link tracking? Visit the Admin panel - Configuration - Data Streams and choose the web data for this configuration. Check that the Enhanced Measurement is on, and in its Settings section, ensure the Outbound option is enabled. Once all clicks are set, just save the changes.
Creating the reports works in the completely same way as we explained above. The standard report is the one that will show once you go to the Reports - Engagement - Events - Clicks, while the creation of Customized reports will require you to select again the metrics that you would like to include.
Tracking outbound links is important if you, for example, have two websites that link each other and want to know how many people navigated between those two.
Cross-domain tracking for downloads on multiple websites
If you, for example, have a website and a blog with separate domains, consider using cross-domain tracking. Cross-domain tracking allows you to identify users across different domains. This means that the system will be able to recognize the same user activity regardless of the domain they’re visiting.
When you set this option, and when you, for example, have an outbound link that leads to your other domain, the option for tracking outbound links will be automatically ignored. If this weren’t the case, you couldn’t follow the same user across your two domains because it would be recognized as a completely new user.
Let’s see how to set this up.
Again, go to Admin - Data Streams and select a website property you want to enable cross-domains.
After the new window appears, click on the Tagging Settings.

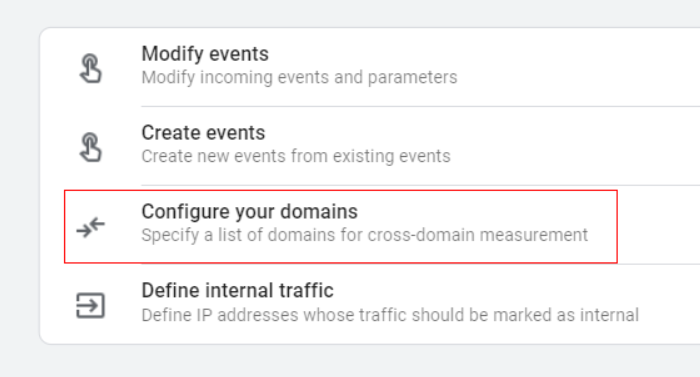
This will lead you to the next window, where you must select Configure your domains.
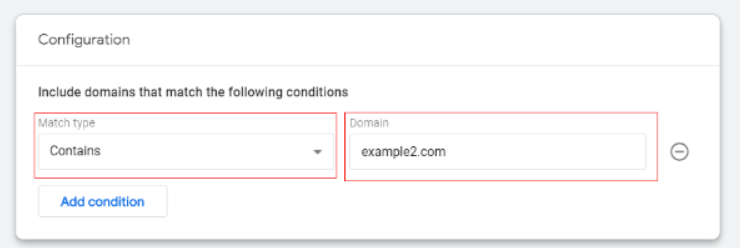
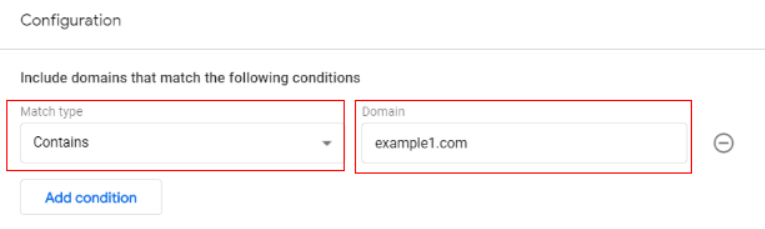
In the next window, click on the Add condition.

Here you will be offered many conditions, but in this case, you can select contains and add the domain link of the second website and click Save.
Now you’re halfway there. You will need to follow the same steps, and when you again come to the last one where you’re adding conditions, this time, you will need to insert the domain link of the first website.
To check if everything is set up correctly, just visit any of those two websites, and if in the URL you see a new parameter _gl just after the website link, it means that you’re good to go!
Conclusion
Tracking downloads with Google Analytics 4 (GA4) provides invaluable insights into user engagement and behavior on your website. By implementing the best practices discussed in this blog post, you can harness the power of GA4 to accurately measure and analyze downloads, optimize your content target strategy, and make data-driven decisions.
We hope this article will help you start tracking downloads more easily and understand your customer journey a bit more. To optimize your omnichannel advertising reporting, meet with a MarinOne consultant today.
Tanja Adamovic is a guest contributor to the Marin Software blog.